

The Dealmaker App was developed to provide real estate investors with a quick solution for analyzing deals, storing deal information and also accessing funding once a deal is submitted.
The app is separated into four main categories:
Enter the address, year built and other basic property information.
Everything you need to determine an accurate estimate of the cost of repairs.
Enter your rehab costs, lending terms, and other critical information. Allows for variations to determine your correct asking price.
Upload and store your images for current or future reference, or to submit for funding.
Everything you need to calculate costs, determine profitability and keep track of your projects. And the best part… It’s Free!


Everything you need to calculate costs, determine profitability and keep track of your projects. And the best part… It’s Free!!
How to Use
To create a report, open the drawer on the left side of the screen, either by pressing on the hamburger menu icon on the top left of the screen or swiping from the left side of the screen. Press the create new report button. A dialog will pop up asking you to give the report a title. Enter the title and press “submit”.
Now a new report has been created. You will see a button with your new report’s title on it and the date it was created. The last report you interacted with (in this case it would be the one you just created) will always be at the top of the list. The rest of the reports will be sorted by creation date with the older reports listed toward the bottom. To switch reports select one from the list.
To delete a report from the list, select and hold (long-press) the report’s button in the report list. A dialog will pop up asking you to confirm (‘delete’) or cancel this action. If you press ‘delete’ your report will be permanently deleted. This is irreversible.
Updating a report is pretty straight forward. Select the report you wish to work on. This makes it active. Edit the fields you wish to change. It is important to know that this has not permanently saved your report’s data yet. These changes will only persist as long as you have the application open. You must save the report to keep your changes even after you close the app. At the bottom of each of the report’s screens (General Info, Profit Calculator, Rehab Calculator) there is a save button. Simply press any of these buttons to save the entire report. Alternatively you may select the file icon in the top right of the header. A drop down menu will appear with an option to save the report. This gives you easy access to saving the report from any screen.
When you are happy with your report you have 2 options. You can share a report or submit it directly to Deployed Capital Group Inc for funding. Select the file icon in the top right of the screen header. A drop down menu will appear giving you 3 options. One is simply to save the report. The other two allow you to share your report (in various ways) or submit your report to Deployed directly via email. By selecting the share option you can then choose to share your report via any email application on your phone to any email address, save your report as a .pdf on your device, send it via messaging apps among other options depending on the applications that are installed on your device.
To access your profile settings, open the drawer on the left side of the screen and press the icon that looks like a person with a pencil in the bottom right of the drawer header. Your user profile consists of 5 fields; your email, name, a profile picture (optional) a password and your phone number. You can change any of these fields but some of them must be updated through different methods:
When you delete your account, all reports and any information related to your account will be permanently deleted. This can’t be undone! If you wish to delete your account anyway, open up your profile settings by selecting the icon of the person with a pencil in the lower right corner of the drawer header.
Your report default settings are values that will be used when you generate a new report. These values influence other calculations in your profit calculator. They represent local area variables (for example property taxes) that may vary depending on where you work and live. To change your report’s default settings, open up the side drawer on the left. In the bottom left hand corner of the drawer there is a settings icon. Press it and the settings modal will pop up with a list of settings you can update.
When you create a new report, the report is generated with the default settings. If you go to the default settings screen and change any of the values there it will update the values in the rest of the report. Remember, you still need to save the report. At the top of the screen there is an options bar where you can do this.
The icon on the left simply closes the keyboard. If you press the third icon from the left ( looks like a floppy disk), it will save the report with the current default settings. An alert popup will then ask if you would like to use these settings as your default settings for future reports. If you select ‘yes’, whenever you generate a new report it will use these settings as your new default.
If you wish to restore the settings to what existed when the application was first installed, press the middle icon that looks like an arrow looping back to the left.
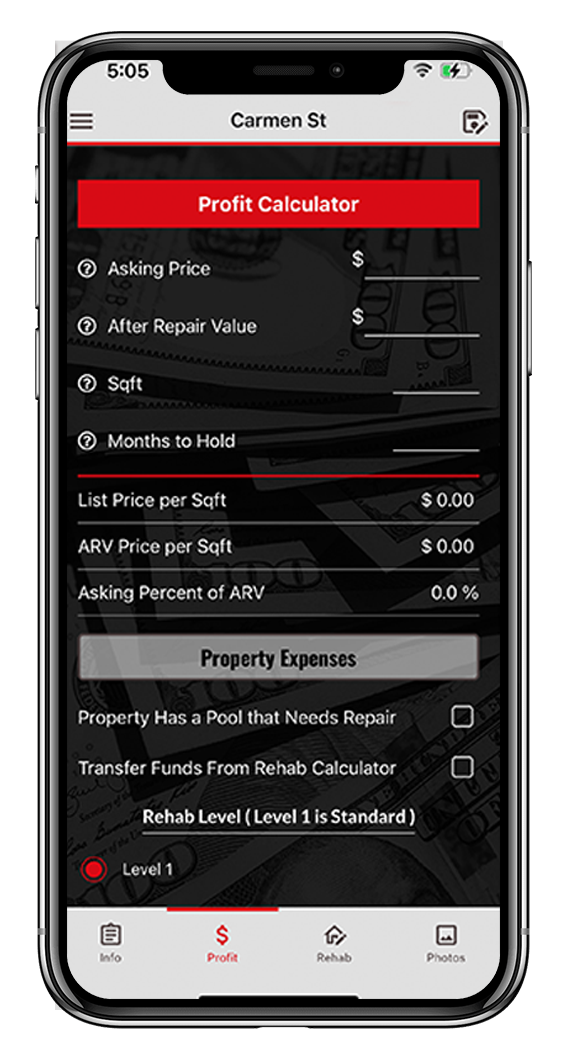
To use the profit calculator simply fill in the form data where prompted. For each value that you enter, any other values that depend on it will be updated (like an excel sheet). Next to some of the fields you will see a tooltip icon that looks like a question mark. When you select it a message will appear telling you more about what that value represents.
The rehab calculator provides a way to estimate the costs associated with rehabbing a property. The values calculated by these forms can be imported into the profit calculator (there is a checkbox on the profit calculator that provides this functionality) or used as stand-alone calculations. The calculations are categorized as such: roofing, exterior painting, interior painting, landscaping, windows, doors, electrical, HVAC, plumbing, kitchens, baths and flooring. There is a toggle button at the top of this screen that allows you to switch between a simple view and a more detailed view of these forms.
The detailed form provides an itemized list of costs for each category. The top section gives you a place to list the “costs per unit of work.” For example, if your roofing costs are $300 per square (100 sq ft) then you’d enter $300 here. There is also a place to enter “other costs” that are not included in the itemized list. Below that section you can enter the “quantity of work” that is needed. To stay with our example, if you had 26 squares of roofing that need to be done, you’d enter 26 here. At the bottom of the form (below contractor quote), you will see the total costs of each itemized cost as well as the total value of all itemized costs. For example, if you entered $300 per square for roofing costs and you entered 26 squares of roofing, then the total cost of roofing would be listed as $7800 (300 * 26).
There is a section provided to enter a contractor’s quote. If you enter a value here, all other values in the itemized list will be ignored and this value will be used. This is a convenience section to enter a quote for all roofing costs that may have been received from a contractor.
At the very top of each section is a header that lists that category you’re calculating values for. On the left is a checkbox. If this is checked (which is the default) the values for this section will be included in the grand total of the entire rehab at the bottom of the form. If you uncheck this box, you will still be able to see what the total costs would be for that section, but it will not be included in the total cost of the rehab. This is useful for situations where you’re not sure if the work needs / will be done, but you still want to know what the cost would be. You can toggle this check box on and off to see how it will affect the total cost of the rehab.
The simple form provides a simpler way to evaluate the costs associated with a rehab project. There is just one input for each rehab section. Adding a value here is the equivalent of filling in the contractor quote section on the detailed form (see above). This provides a convenient way to either enter a quote from a contractor, or estimate the total costs associated with the work for each rehab section.
It is not necessary but you may switch back and forth between the detailed form and the simple form. Why is it not necessary? Well, if you want to use some itemized categories and some contractor quotes, you need only to use the detailed form. However, if you do use the simple form
Coming Soon.

OutFast Realty & Investments LLC.
1718 E 7th Ave suite 201b, Tampa, FL 33605
© 2024 Out Fast REALTY & INVESTMENTS LLC. All Rights Reserved.